![[VIP] Talkative Brand Book & Style Guide](https://design.rip/uploads/cover/blog/talkative-brand-book--style-guide.webp)
![[VIP] UX Stack Guru](https://design.rip/uploads/cover/blog/uxstackguru-bwikur.webp)
![[VIP] The Professional Style Guide Kit](https://design.rip/uploads/cover/blog/the-professional-style-guide-kit--indesign-format.webp)


![[VIP] DesignCode: Build Beautiful Apps with GPT-4 and Midjourney](https://design.rip/uploads/cover/blog/designcode-gpt4.webp)
![[VIP] AppCoda: Mastering SwiftUI - Professional Packet (Updated 04.2023)](https://design.rip/uploads/cover/blog/appcoda-mastering-swiftui-professional-packet-worth.webp)
![[VIP] AppCoda: Beginning iOS Programming with Swift (Updated 04.2023)](https://design.rip/uploads/cover/blog/appcoda-beginning-ios-programming-with-swift.webp)


![[VIP] Whoooa! 156 vector Lottie animations](https://design.rip/uploads/cover/blog/whoooa-156-vector-animations.webp)


![[VIP] Motion Sound Vol. 1](https://design.rip/uploads/cover/blog/designrip-svx.webp)
How to create an aqua effect in Figma
We’ve recently launched a new version of the Mockup Plugin where we’ve added the ability to transform shapes into various surfaces using neural networks. And one of the most complex styles to configure is the aqua effect.
We’ve recently launched a new version of the Mockup Plugin where we’ve added the ability to transform shapes into various surfaces using neural networks. And one of the most complex styles to configure is the aqua effect.
The model is trained to work with simple vector shapes.
It works with:
- Large letters
- Simple logos
- Basic geometric shapes
It doesn’t work with:
- Photographs
- Illustrations
- Small text
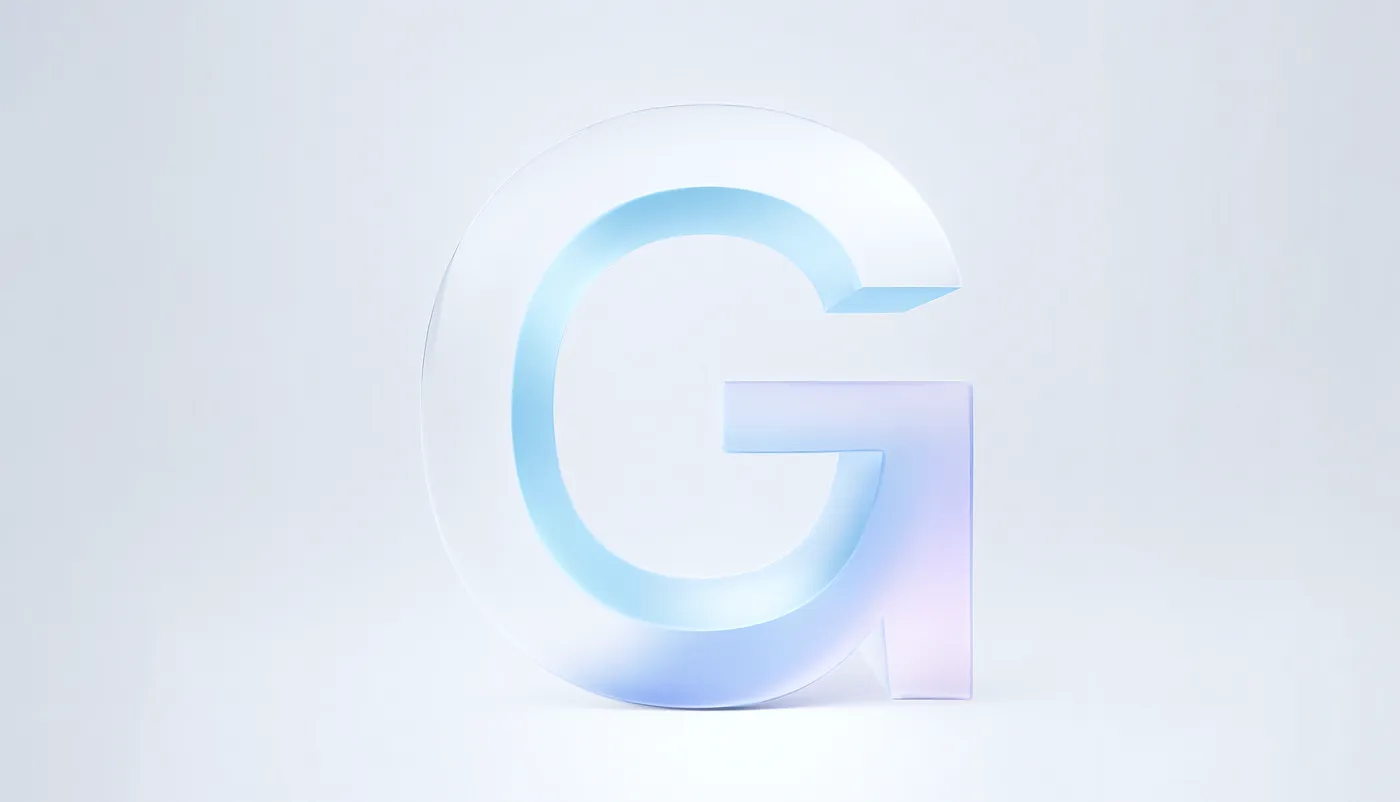
The aqua effect is a complex and temperamental style. It may not handle text well as the neural network will strive to give volume and refractions to the text, which is challenging for fine details. Hence, if given a choice between two images, a simple one (like the one on the left) would yield better results.

To begin, launch the plugin and switch to the AI section. Select the aqua style and initiate the first generation. You may observe that the first generation may not be successful due to significant shape deformation.

As you can see, the first generation is not successful, the shape is too heavily deformed.
To rectify this, access the Advanced setup and slightly augment the shape. The logic behind this function is such that the higher the value you set, the less the effect takes over the style, but the better the original style is preserved. Striking a balance here is crucial, and the optimal slider value always depends on the shape of your original design.

The improvement will be noticeable. The neural network should be able to handle the task and create a beautiful picture.
You’ll notice an improvement in the result. The neural network should be able to create a visually pleasing picture. At this stage, you can experiment further by adjusting Precision and Style. For a more vibrant picture, you can add prompts like: glass, refraction, colorful, and aberration.

After these steps, the result should be visually appealing. Additional style and shape can be added for a richer look.

If you want to make the picture more complex, install the Fig3d plugin. Repaint the letter in white and launch the plugin. Add perspective
![[optimize output image]](https://cdn.prod.website-files.com/625816a3416990dd61391b9b/64badbda451509f5bfd625f9_ezgif-4-8d8b63f7a2.gif)
And then try the generation.


At the very end, don’t forget to first click on ‘enhance’ and then ‘upscale’ to get a 4K image.

The style also works well when layering elements on top of each other. Therefore, I put together this composition.

Here, I made the text semi-transparent and added a circle shape to the background.

After generating your image, you can always further adjust color correction in Figma. To do this, double-click on the image layer.

Experiment and inspire!

What's Your Reaction?