![[PRO] Company Starter Kit](https://design.rip/uploads/cover/blog/company-starter-kit.webp)
![[VIP] Uicon V1.0 / Animated Icons](https://design.rip/uploads/cover/blog/uicon.webp)

![[VIP] Talkative Brand Book & Style Guide](https://design.rip/uploads/cover/blog/talkative-brand-book--style-guide.webp)
![[VIP] UX Stack Guru](https://design.rip/uploads/cover/blog/uxstackguru-bwikur.webp)
![[VIP] The Professional Style Guide Kit](https://design.rip/uploads/cover/blog/the-professional-style-guide-kit--indesign-format.webp)
![[LS] iPhone 14 Pro Longscroll Mockups](https://design.rip/uploads/cover/blog/iphone-14-pro-longscroll-mockups.webp)
![[LS] Acryl Abstractions](https://design.rip/uploads/cover/blog/acryl-abstractions.webp)


![[VIP] PАТАТА SCHООL: 2D to 3D Grease Pencil in Blender](https://design.rip/uploads/cover/blog/patataschool-blender-grease-pencil.webp)
![[VIP] The curious craft of demo reel titles](https://design.rip/uploads/cover/blog/the-curious-craft-of-demo-reel-titles.webp)
![[VIP] DesignCode: Build Beautiful Apps with GPT-4 and Midjourney](https://design.rip/uploads/cover/blog/designcode-gpt4.webp)
![[VIP] AppCoda: Mastering SwiftUI - Professional Packet (Updated 04.2023)](https://design.rip/uploads/cover/blog/appcoda-mastering-swiftui-professional-packet-worth.webp)
![[VIP] AppCoda: Beginning iOS Programming with Swift (Updated 04.2023)](https://design.rip/uploads/cover/blog/appcoda-beginning-ios-programming-with-swift.webp)


![[VIP] Whoooa! 156 vector Lottie animations](https://design.rip/uploads/cover/blog/whoooa-156-vector-animations.webp)
![[VIP] Design+Code: Learn to design and code React and Swift apps [2017-2023, ENG + Sub]](https://design.rip/uploads/images/202312/image_430x256_658ccc86afe53.webp)


![[VIP] Motion Sound Vol. 1](https://design.rip/uploads/cover/blog/designrip-svx.webp)
How We Made Butter Royale Look Good Enough to Eat — Do Not Lick Your Screen!
Salutations! This is Melissa Tan, a game artist at Mighty Bear Games. In this post, I’m going to share how we achieved the polished look of Butter Royale’s game environment. This is a render style that’s popular and easy to achieve. If this is a treatment that you’re curious about, stick around because we gonna “bear” it all!
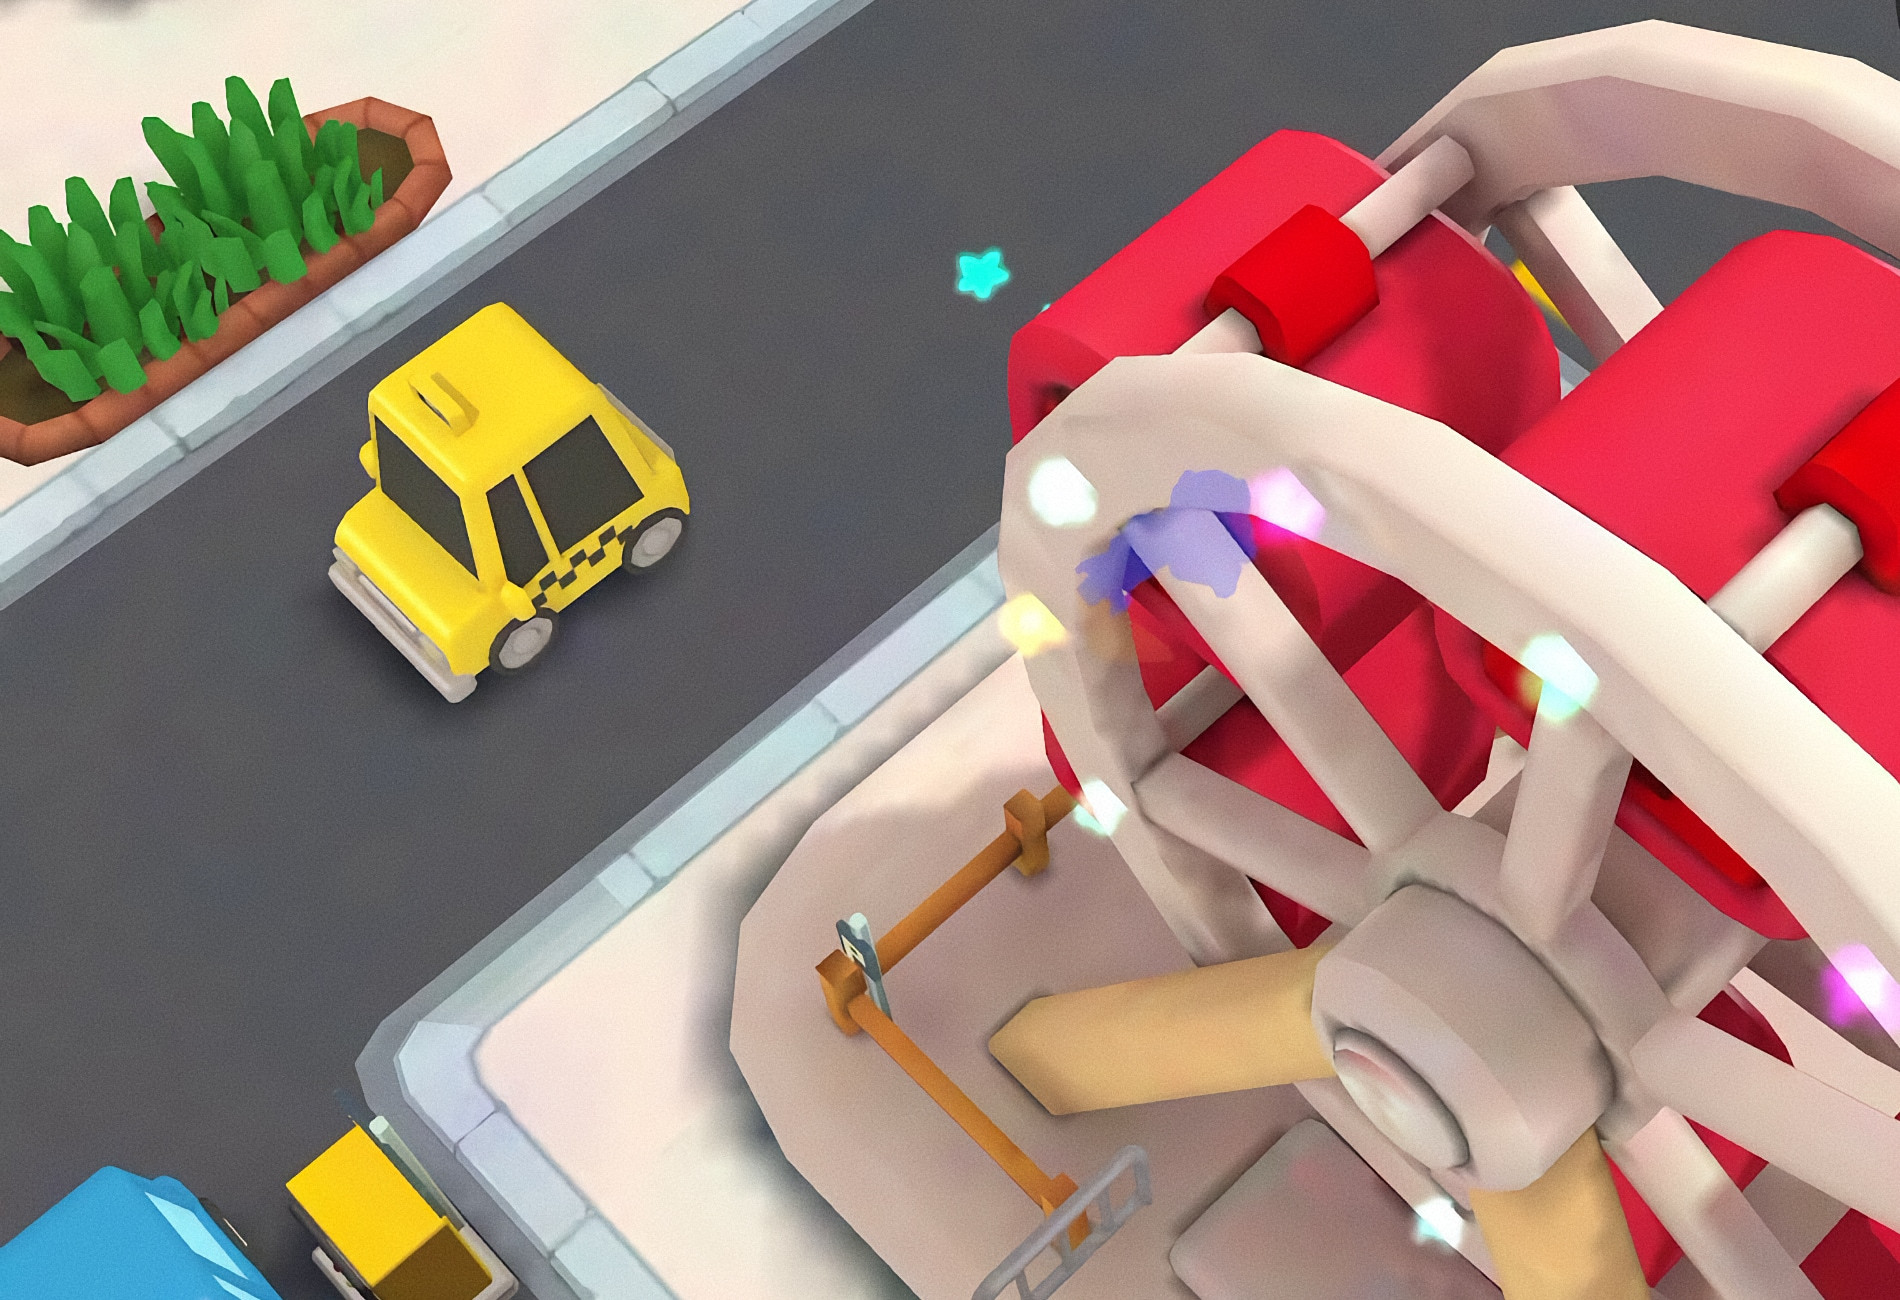
Dang, so cute, I wanna live inside of it
I will talk about our 3 contributing factors
- Art style guidelines
- 3D model treatment and preparation
- UV maps and Blender render
Art Style Guide
Before kicking off work on any project we spend time familiarising ourselves with the Game Vision (the expectations set for the final product), intended audience, the production time and the intended platforms. With that in mind, we all weigh in with our creative input on how the game could look by collecting art references and making concept art. We usually end up with the start of an Art Bible — a guide to how the game should look and feel.
While the Art Bible covers tone, look and feel of the product (the What), the Art Style Guides cover the technical aspects of achieving the style (the How).
The Lead Artist takes the team’s suggestions and creates an Art Style Guide document. In this case, the focus is for the Environment Art for Butter Royale.
Once in place, the Style Guides help ensure the team’s work is aligned with the original intended style range and branding.
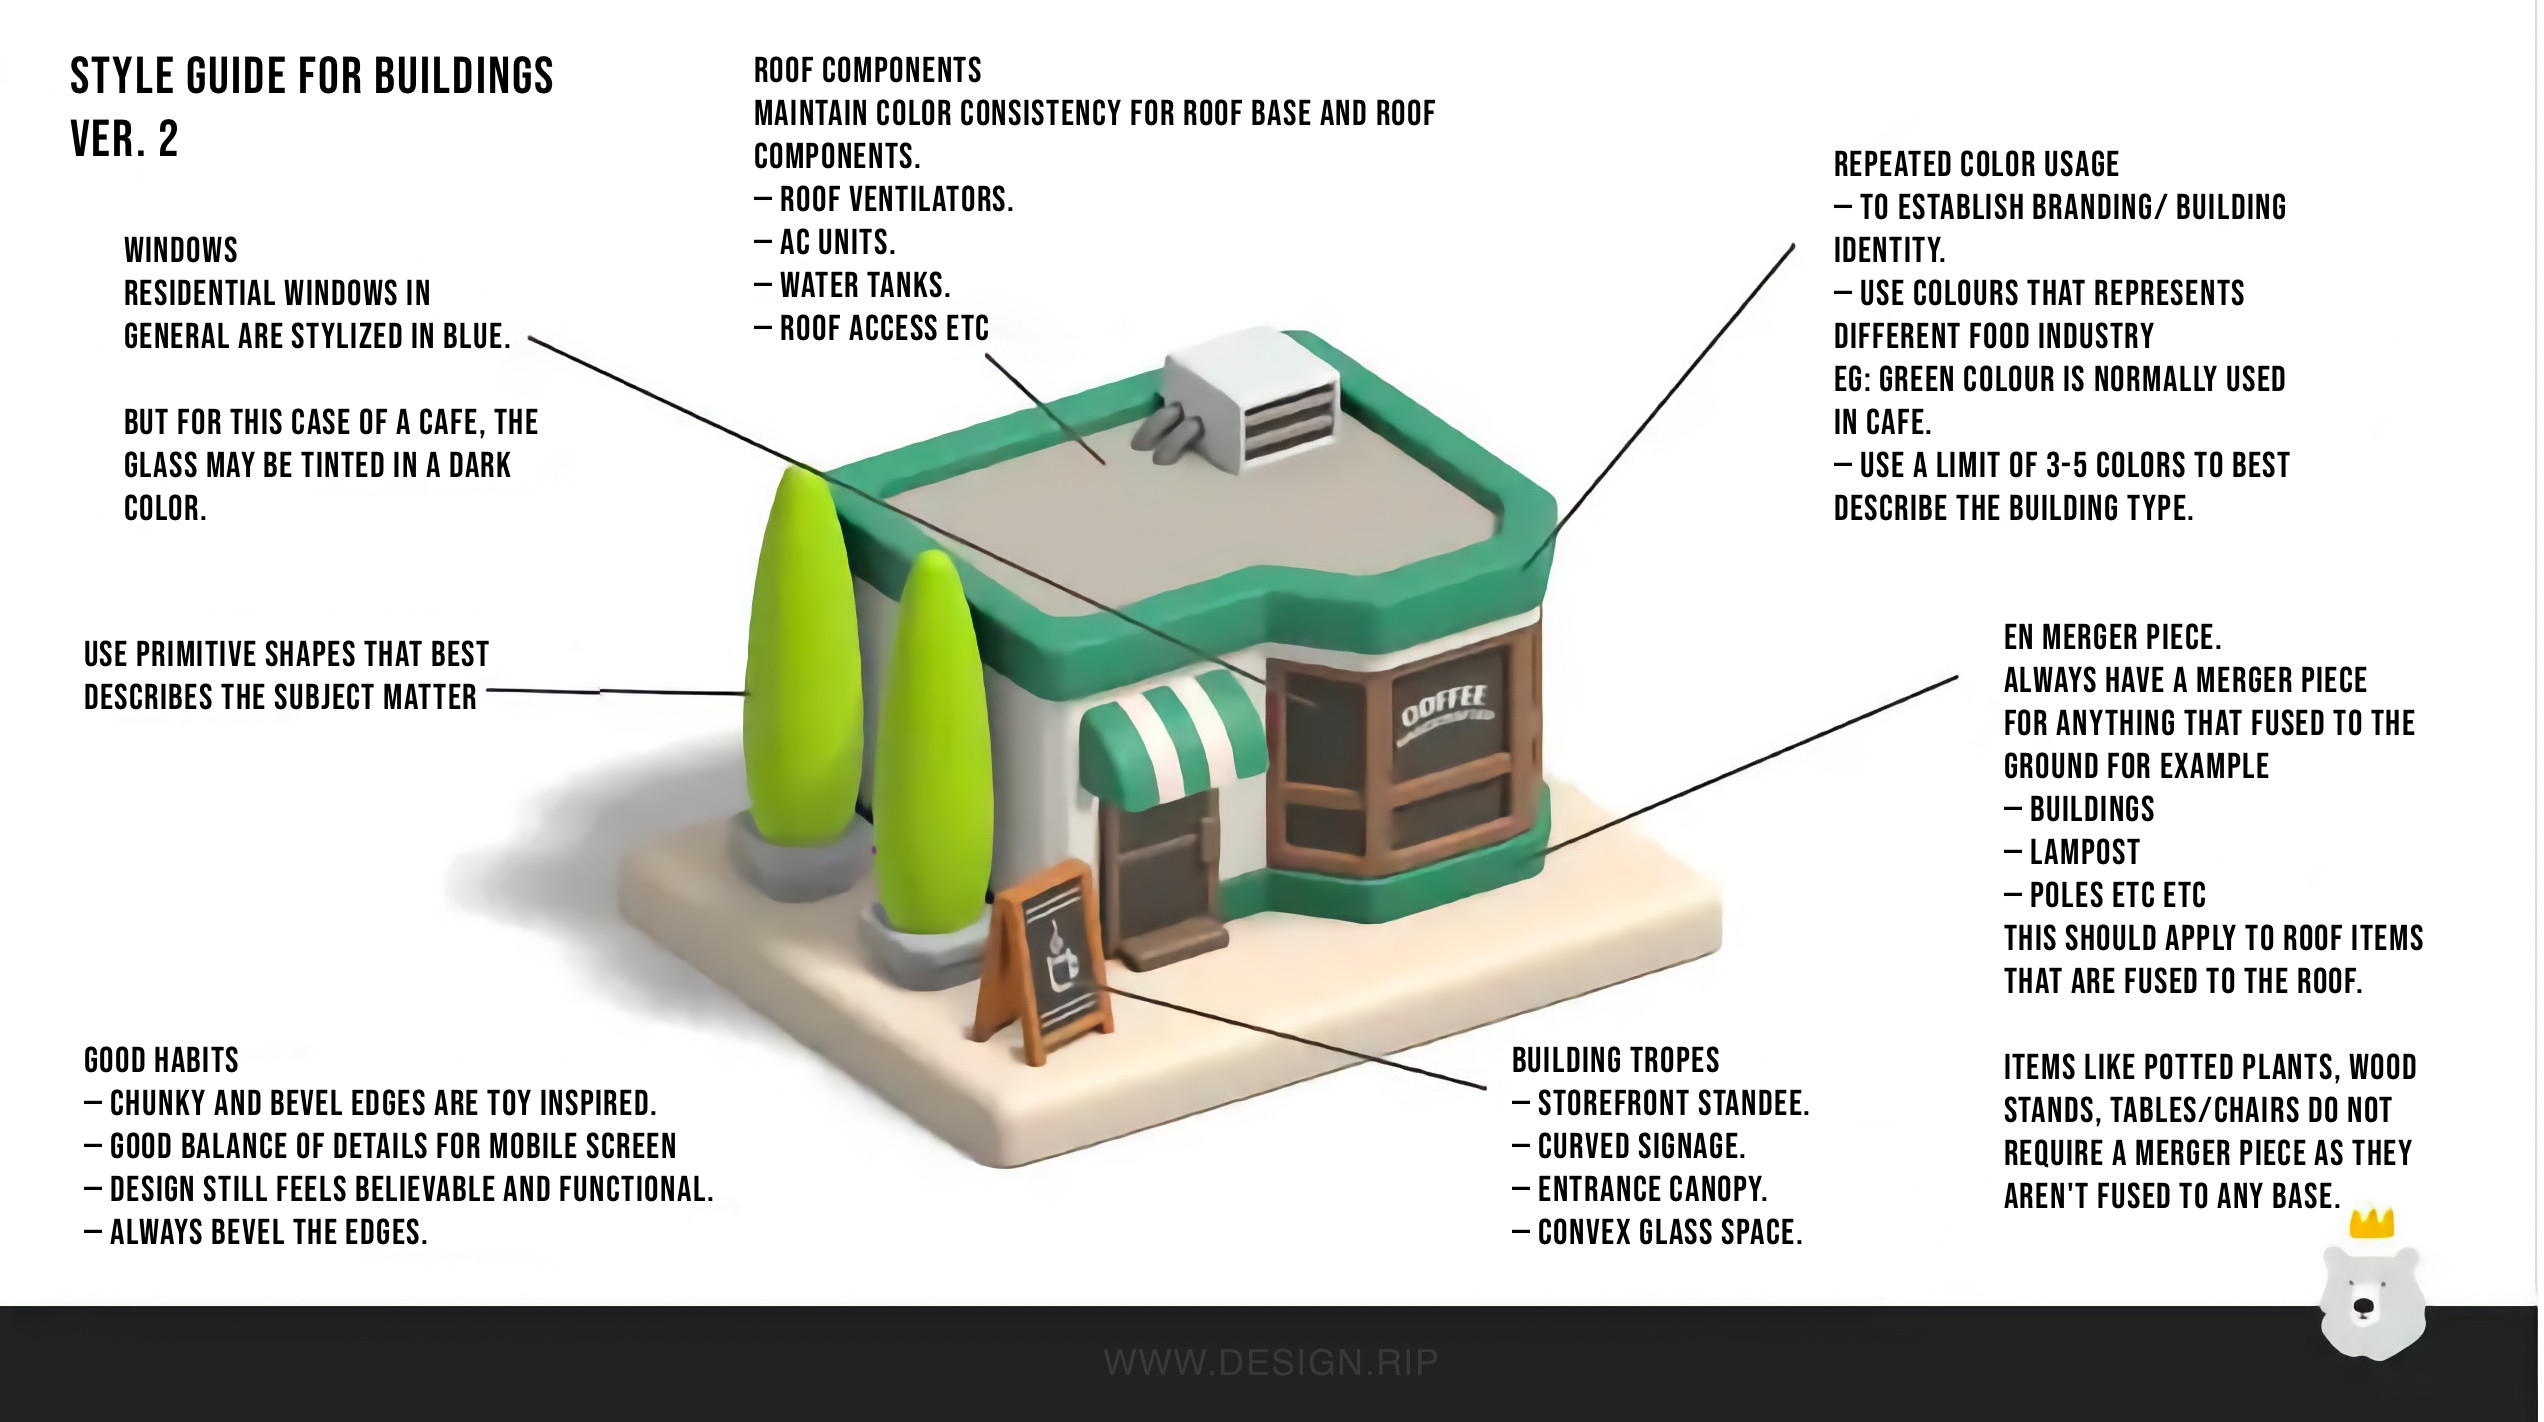
Here is an actual slide of our art style guide:
3D Model Treatment
Now that a clear art direction and style guide is in place, we move on to the treatment of the 3D assets.
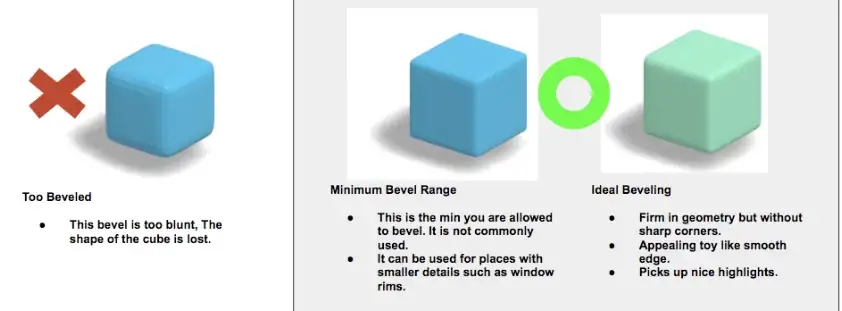
A big contributing factor of getting the Butter Royale look is bevelling: all of our assets have the same visual consistency of chunkiness and soft edges.
In the real world, all objects are bevelled: table corners, monitors and so on. A non-bevelled 3D object suffers when it’s put through render processes, especially when lighting is thrown in to calculate the surface, resulting in very unrealistic hard edges.
In short, a non-bevelled edge spells artificial CG and we all want to avoid that. In our case doing bevels have a specific role - under the right lighting conditions, it helps to pick up really good highlights. This enhances the chunky, bouncy look that we’re going for in Butter Royale. Here is a bevel range that we followed.
Keep a habit of having a range limit for all aesthetics that you approach, it helps with style consistency!
Making Cute Cubes
Preparing the Models
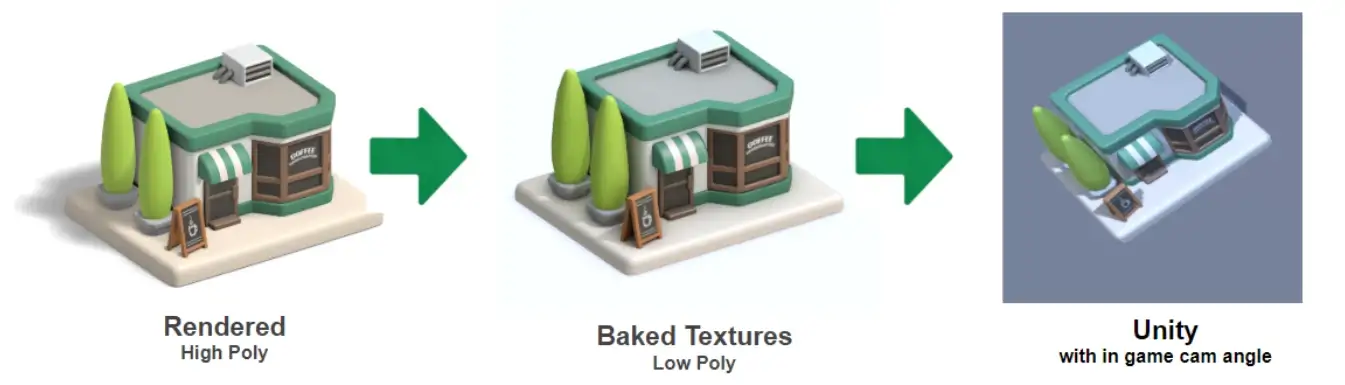
We use a tool called Blender for Render Baking. This is a technique where you bake light/shadow information directly on the main texture map. This saves a lot of time when rendering the scene in Unity. It renders much faster as the light/shadow of these objects no longer needs to be computed in real-time.
Baking is just transferring one detail of an object to another to speed things up.
For example, when rendering an object with lighting, specular or shadow. This process will take you a long time to render one frame. But if you have pre-baked lighting, shadows or even speculars (!) on a texture map you will save a lot of time not having to compute these things hence faster-rendering speed.
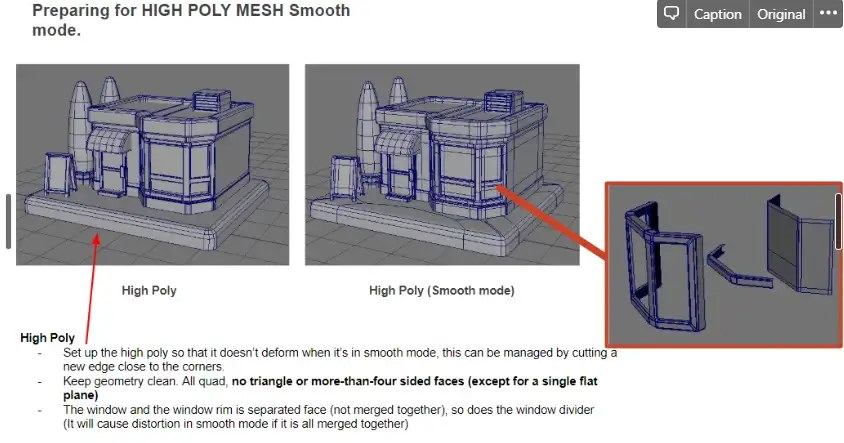
How do you prepare 3D models in Blender for baking? You make the high-poly and low-poly models match as close as possible.
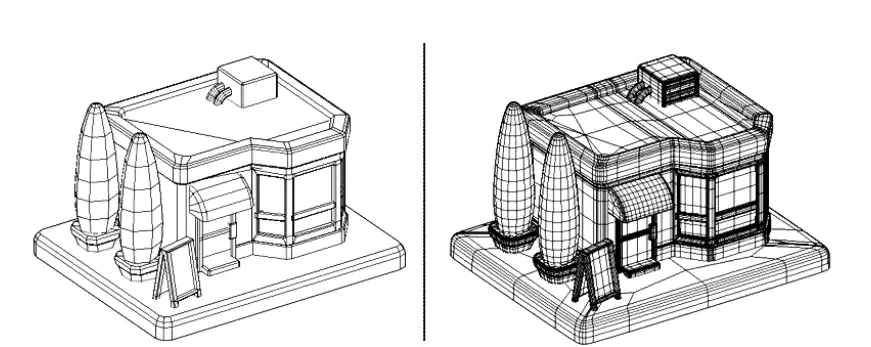
Look ma, primitive shapes!
What to take note of when creating both the high and low poly models:

UV Maps and Blender Treatment
High Poly UV Mapping and Texturing
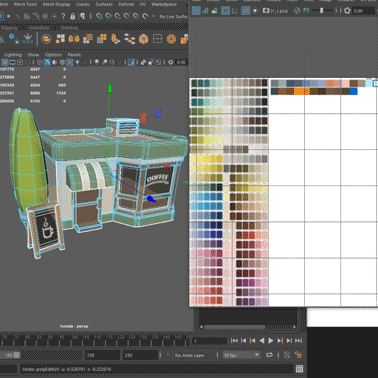
Given our cartoony art style, we have been using our own method of doing texturing and UV mapping for high poly models: we prepare a colour chart that contains plenty of different colours (our own colour palette). We then pick areas of the model of the same colour and collapse their corresponding UVs onto the colour block that we want.
The outcome is that the entire selection becomes mapped with the colour of the block we chose in the chart. This means we can quickly texture entire chunks of the models, but also quickly update an existing colour, since we just need to tweak a single block.
This, of course, works for flat colours. For more complex images and painting we need to map, we’ll use the traditional proper unwrap, then painting.
Our high poly models can even use multiple materials, as they can all be baked down to a single in-game texture.
In the case of unique textures, fonts, or colours, some texture budget is set aside for these instances.
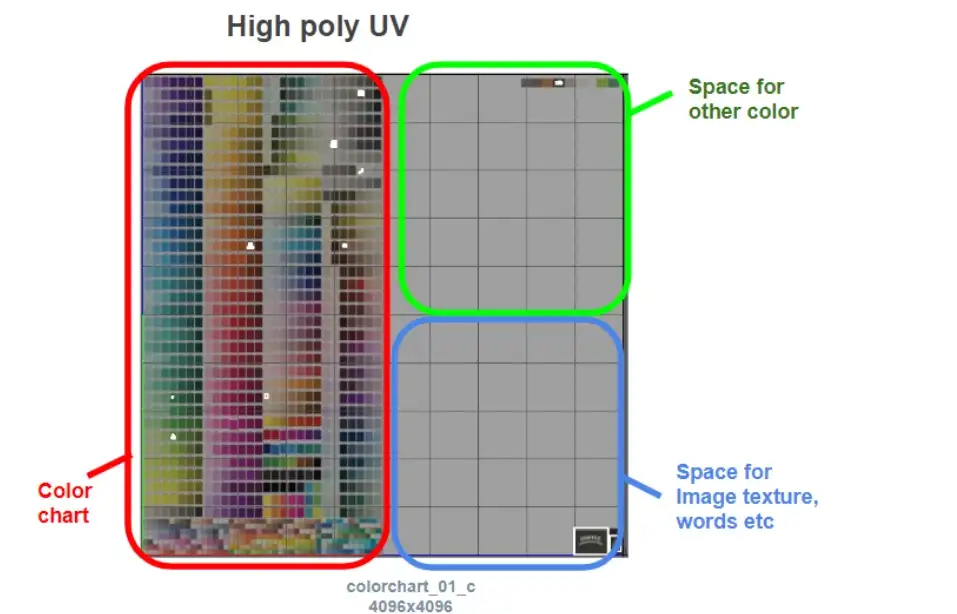
Note the collapsed UVs, placed in small coloured boxes.
Low Poly UV mapping
Next is low poly UV mapping. We unwrap the UV map and make sure the UV space is well utilised. Having the islands in a neat manageable order prevents errors when you transfer the high poly model over the low poly model.
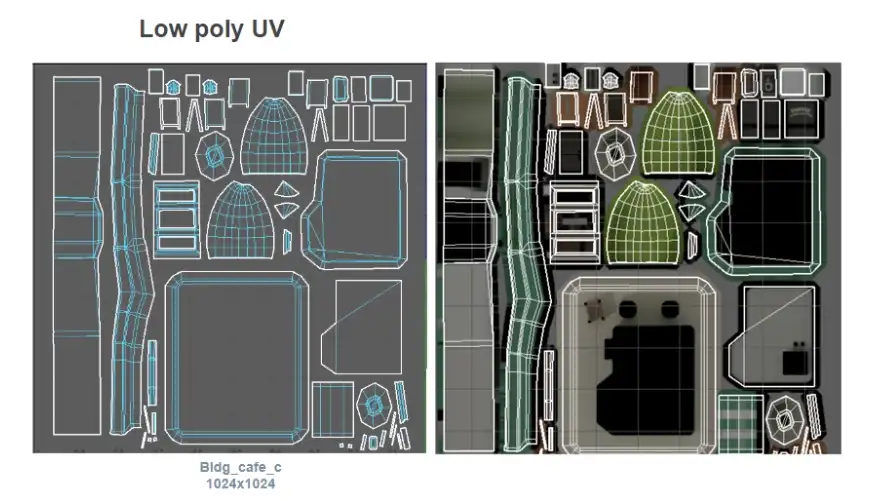
Note how all UVs are fully unwrapped, no overlap occurs.
Baking and Final Checks
Once the models and textures are done, what’s left is to play with is the rendering. We have a style guide for rendering too! This serves as a general checklist to ensure the assets are readable.
The baking step delivers the final polished look:
- Pre-rendered High poly to real-time Low poly render output must be as similar as possible.
- Good projection of lighting, contrast, capturing the correct highlights/ specularity.
- Appropriate Shadow intensity where it best shows the asset volumes.
Note: in order to capture and bake specular and reflections, we’ve been using a custom shader in Blender. We’ll write more about this method in another post.
Closing Thoughts
This was a very high-level overview of how we approached visual development and implementation of our environments for Butter Royale.
With what we covered in mind, remember to always keep things simple as it is very easy to over-complicate a workflow or add too many details in a model to the point where it is not scalable. Simplicity is key (・Θ・;)
What’s Next?
Our Baking pipeline, or we achieved the transfer of GI, shadows, AO, specular and reflections onto static maps.
What's Your Reaction?